
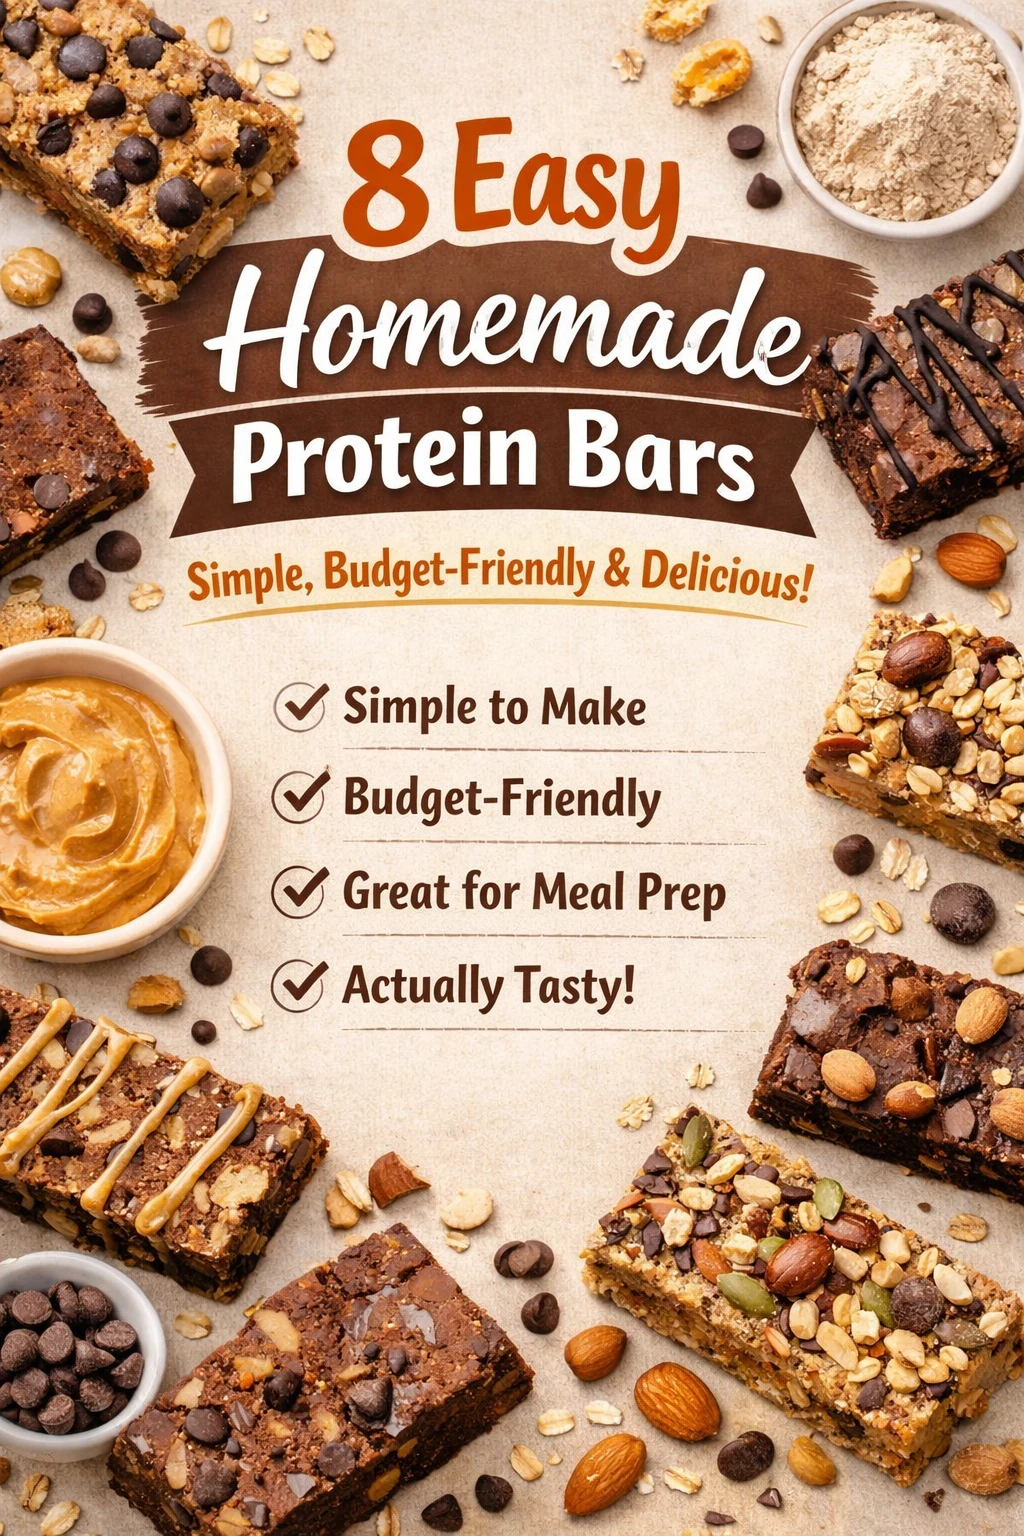
You Won’t Believe How Easy These Homemade Protein Bars Are
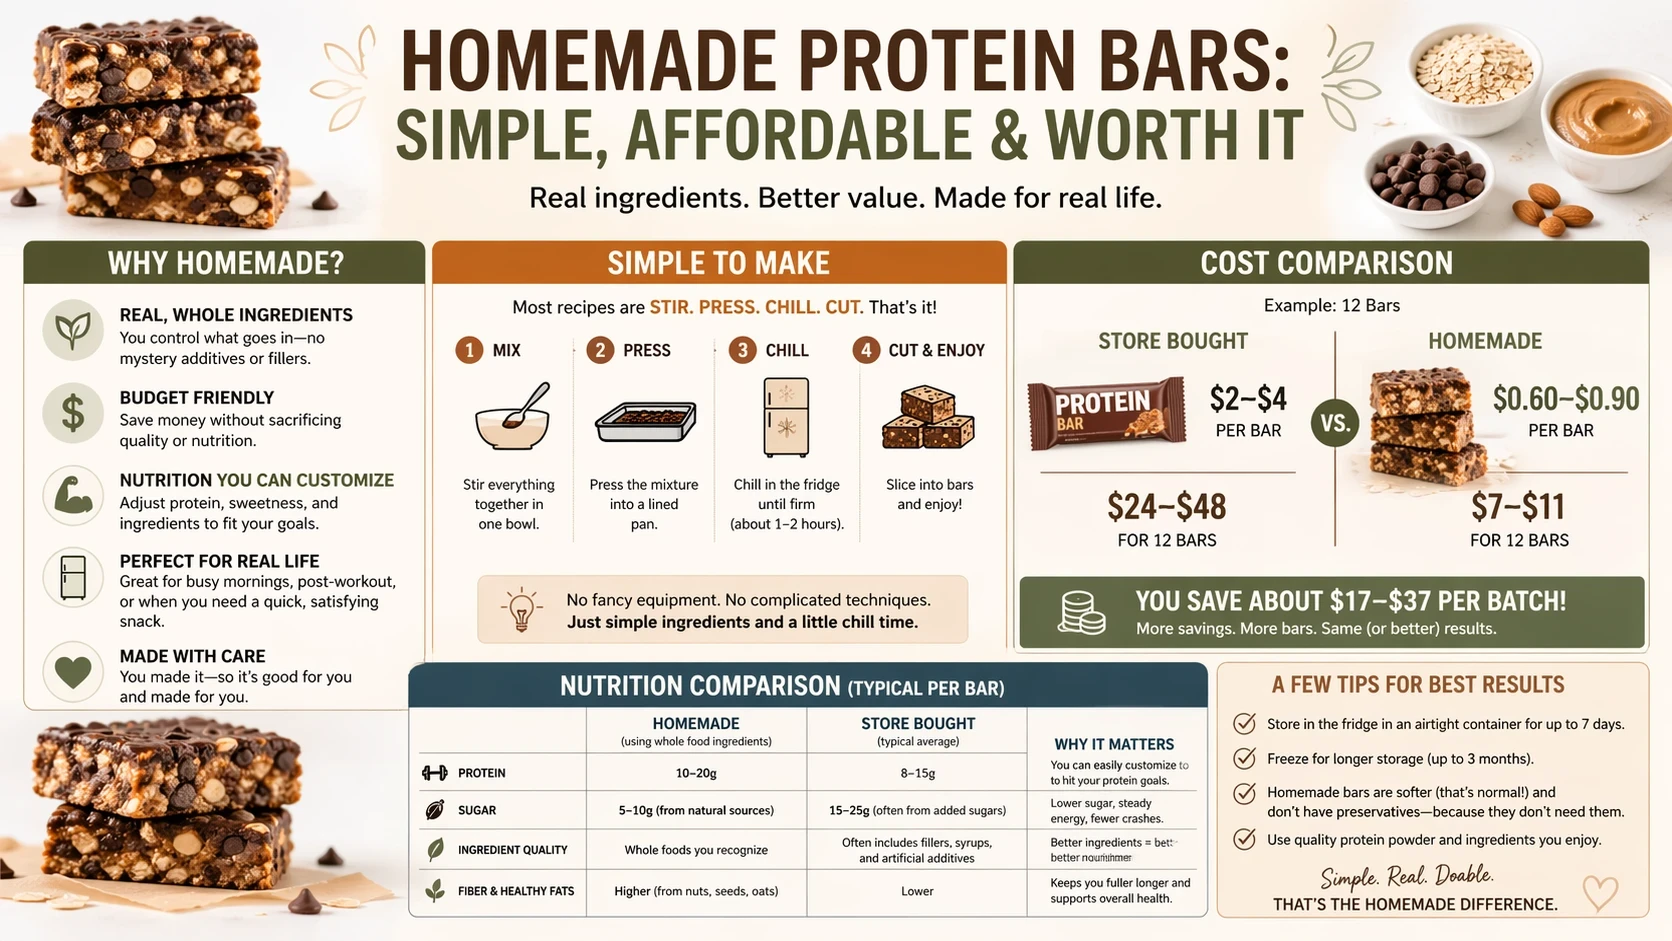
If you’ve ever stood in the grocery aisle debating whether a single protein bar is really worth $3, you already know the problem. They’re convenient, they seem healthy, and they promise to fix your snack craving in one neat little package, but the price can add up real fast. Paying $2 to $4 per bar starts to feel less like a simple convenience and more like a habit your budget can’t keep up with.
The good news is that homemade protein bars are far easier than they sound. You do not need a fancy blender, a complicated ingredient list, or an entire Sunday dedicated to meal prep. Most of these recipes are stir-and-press recipes, which means you mix everything in a bowl, press it into a pan, chill it, and cut it into bars. That’s all, no full-on social media production required.
These are the types of snacks that work for real, everyday life: busy mornings, chaotic afternoons, post-workout hunger, the “I need something now or I’m going to eat crackers over the sink” moment. They’re made with simple ingredients, they keep well in the fridge, and they’re flexible enough to work with whatever protein powder or nut butter you already have at home.
This post focuses on 8 easy homemade protein bar recipes that are:
- simple to make
- budget-friendly
- meal-prep friendly
- easy to store
- actually enjoyable to eat
Quick heads up: homemade protein bars are usually a little softer and less shelf-stable than the ultra-processed packaged kind, because they don’t contain the same stabilizers and preservatives. That’s not a bad thing — it just means they’re best stored in the fridge and eaten within about a week, or frozen for longer.
https://www.healthline.com/nutrition/how-much-protein-per-day
https://www.today.com/health/diet-fitness/are-protein-bars-good-for-you-rcna139589
https://www.performancelab.com/blogs/nutrition/protein-bar-vs-shake
Why homemade protein bars are worth it
Store-bought protein bars are basically the perfect example of paying extra for convenience. Sometimes that convenience makes sense. If packing one in your bag keeps you from buying a $9 airport sandwich, I respect the move. But for everyday eating, homemade bars make a lot more sense.
Here’s why:
- They cost less per bar. Even with protein powder included, homemade bars are usually much cheaper than individually wrapped bars.
- You control the ingredients. No mystery syrups, no chalky coating, no “birthday cake cookie dough brownie swirl” situation unless you truly want that.
- They’re easy to customize. You can make them sweeter, less sweet, nuttier, softer, firmer, higher fiber, peanut-free — whatever works for you.
- They’re practical. Once you make a batch, you’ve got breakfast backup, a gym snack, or an afternoon snack ready to go.
If your goal is to eat healthier without turning every snack into a major kitchen project, this is a very good category to have in your back pocket.
One-stop grocery run before you start.
A few tips before you start
These recipes are intentionally easy, but a few basic tips will make them turn out better.
1. Use rolled oats, not steel-cut oats
Rolled oats give the bars structure and a good chewy texture. Steel-cut oats are too hard, and instant oats can make the bars a bit mushier. If all you have is quick oats, they’ll still work — the bars will just be a little softer.
2. Start with less liquid than you think you need
A lot of homemade bar recipes go wrong because the mixture is too wet. You want it thick enough to press firmly into a pan. If it feels like oatmeal, it’s too loose. Add liquid slowly and stop when the mixture holds together.
3. Press the mixture down firmly
This matters more than it seems. Use the back of a spoon, a spatula, or even the bottom of a measuring cup to pack the mixture tightly into the pan. That helps the bars hold together when you slice them.
4. Chill before cutting
If you try to slice them right away, they’ll fall apart. Give them at least an hour in the fridge so they can firm up.
5. Store them cold
Most of these bars keep best in the refrigerator in a sealed container. If you want them to last longer, freeze them with parchment between the layers so they don’t stick together.
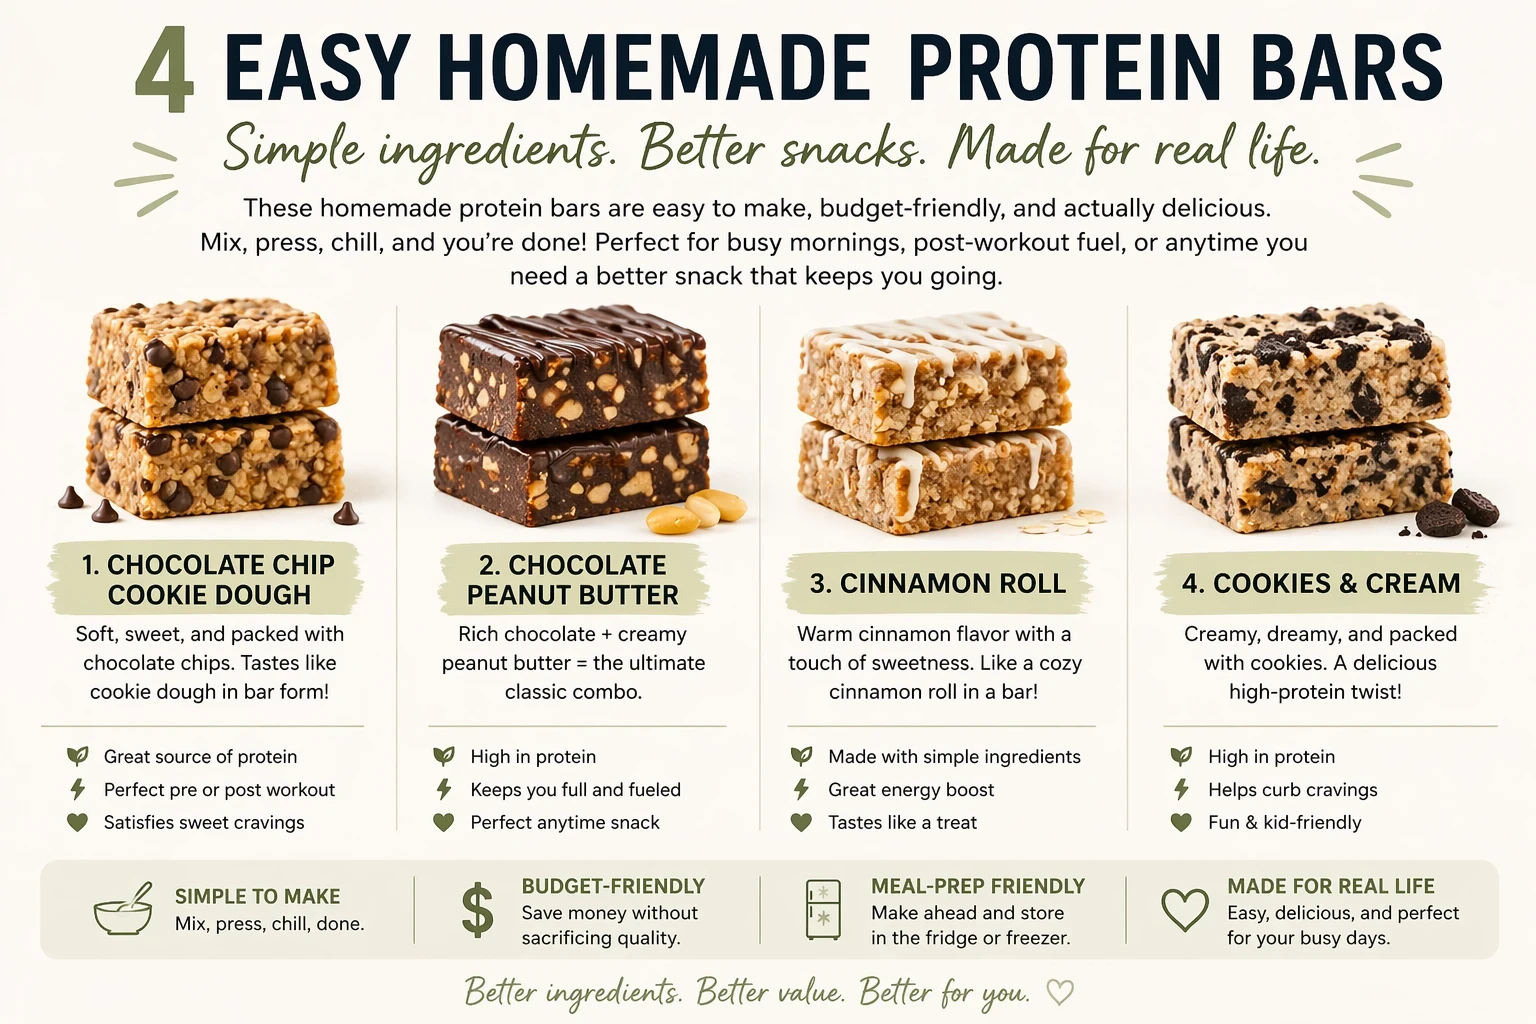
1. Peanut Butter Oat Protein Bars
This is the easiest, most dependable homemade protein bar in the group. If you make only one recipe from this list, make this one first. It’s simple, filling, and built from ingredients most people already have around.
Ingredients
- 2 cups rolled oats
- 1 cup peanut butter
- 2 scoops vanilla or plain protein powder
- 1/3 cup honey or maple syrup
- 1/4 to 1/3 cup milk or water
- 1/2 teaspoon salt
- Optional: 1 teaspoon vanilla extract
Instructions
- Line an 8×8-inch pan or small baking dish with parchment paper.
- In a large bowl, stir together the oats, protein powder, and salt.
- Add the peanut butter and honey.
- Pour in the milk a little at a time and mix until the mixture comes together into a thick, slightly sticky dough.
- Press the mixture firmly into the prepared pan.
- Refrigerate for at least 1 hour.
- Slice into bars or squares.
Why this one works
Peanut butter does most of the heavy lifting here. It adds protein, healthy fats, and enough stickiness to bind everything together without baking. Oats keep the bars hearty and affordable, while the protein powder boosts the staying power.
Make-it-easier note
If your peanut butter is very stiff, microwave it for 10 to 15 seconds so it mixes more easily.
Storage
These keep well in the fridge for 5 to 7 days and freeze beautifully.
2. Chocolate Peanut Butter Protein Bars
If you like the idea of a protein bar but want something that feels a little more like a treat, this is the one. It still has practical snack energy, but it also tastes like you had a better plan than just grabbing whatever was in the pantry.
Ingredients
- 2 cups rolled oats
- 1 cup peanut butter
- 2 scoops chocolate protein powder
- 2 tablespoons cocoa powder
- 1/3 cup honey or maple syrup
- 1/4 to 1/3 cup milk
- 1/2 teaspoon salt
- Optional: 2 tablespoons mini chocolate chips
Instructions
- Line a square pan with parchment paper.
- In a bowl, mix the oats, chocolate protein powder, cocoa powder, and salt.
- Stir in the peanut butter and honey.
- Add milk a little at a time until the mixture is thick and pressable.
- Fold in chocolate chips if using.
- Press firmly into the pan.
- Chill for at least 1 hour before slicing.
Why this one works
Chocolate covers a lot of sins, including mediocre snack moods. The cocoa gives these a richer flavor, and the peanut butter keeps them from turning dry and sad.
Busy-person tip
These are great to keep in the fridge for the part of the day when you want dessert but also need actual fuel.
Storage
Store in the fridge for about 1 week.
3. No-Bake Banana Oat Protein Bars
These are soft, lightly sweet, and good for using up a ripe banana that’s just one day away from becoming banana bread pressure.
Ingredients
- 2 cups rolled oats
- 1 ripe banana, mashed
- 1/2 cup peanut butter or almond butter
- 2 scoops vanilla or plain protein powder
- 1 teaspoon cinnamon
- 1 to 2 tablespoons honey, optional
- 1 to 3 tablespoons milk, if needed
- Optional: 1 tablespoon chia seeds
Instructions
- Line a pan with parchment paper.
- In a bowl, mash the banana until smooth.
- Stir in the peanut butter.
- Add oats, protein powder, cinnamon, and chia seeds if using.
- Mix well. If the mixture feels too dry, add a little milk. If it’s already soft and sticky, skip the liquid.
- Press into the pan and chill until firm.
- Slice and store in the fridge.
Why this one works
Banana adds natural sweetness and softness, which makes these taste more breakfast-y than bar-like in the best way.
A realistic heads-up
Because banana adds moisture, these bars are softer and a little less sturdy than the peanut butter versions. They’re still easy to make — just not the best choice if you want something you can toss in a hot car and forget about.
Storage
Best within 3 to 5 days in the fridge.
4. Apple Cinnamon Protein Bars
These taste like the snack version of trying to get your life together. Cozy, simple, and surprisingly useful on hectic mornings.
Ingredients
- 2 cups rolled oats
- 1/2 cup unsweetened applesauce
- 1/2 cup peanut butter or almond butter
- 2 scoops vanilla protein powder
- 1 to 2 teaspoons cinnamon
- 2 tablespoons honey or maple syrup
- 2 to 4 tablespoons chopped walnuts or raisins, optional
- Pinch of salt
Instructions
- Line a pan with parchment paper.
- In a large bowl, mix the oats, protein powder, cinnamon, and salt.
- Add applesauce, peanut butter, and honey.
- Stir until well combined. If using raisins or chopped nuts, fold them in.
- Press firmly into the pan.
- Chill until set, then slice.
Why this one works
Applesauce makes the bars soft and gives them that familiar apple-cinnamon flavor without needing fresh fruit. They feel a little more interesting than plain bars but are still very low effort.
Optional variation
If you want a firmer texture, bake them at 350°F for about 12 to 15 minutes, then cool completely before slicing.
Storage
Keep refrigerated for 4 to 6 days.

5. Trail Mix Protein Bars
These are what you make when you want something practical but you also want a little texture and crunch. They’re a great clean-out-the-pantry recipe too.
Ingredients
- 2 cups rolled oats
- 3/4 cup peanut butter
- 2 scoops vanilla or plain protein powder
- 1/3 cup honey
- 1/4 cup chopped peanuts or almonds
- 1/4 cup raisins or dried cranberries
- 2 tablespoons sunflower seeds or pumpkin seeds
- 2 to 4 tablespoons milk as needed
- Pinch of salt
Instructions
- Line a pan with parchment paper.
- In a large bowl, stir together oats, protein powder, nuts, dried fruit, seeds, and salt.
- Add peanut butter and honey.
- Mix well, adding a small amount of milk if needed to help everything stick together.
- Press very firmly into the pan.
- Refrigerate until firm, then slice into bars.
Why this one works
It’s basically a more filling, protein-boosted version of trail mix in bar form. You get chewiness, crunch, and enough substance to make it feel like more than a snack that disappears in three bites.
Budget tip
Use whatever nuts and seeds are cheapest or already open in your pantry. This recipe is very forgiving.
Storage
Keeps well for up to 1 week in the fridge.
6. Sunflower Seed Butter Protein Bars
This is the peanut-free version that still delivers the same easy no-bake bar formula. It’s especially useful if you need something lunchbox-friendly or just want a change from peanut butter.
Ingredients
- 2 cups rolled oats
- 1 cup sunflower seed butter
- 2 scoops vanilla or plain protein powder
- 1/3 cup honey or maple syrup
- 1/4 cup milk
- 1/2 teaspoon salt
- Optional: 2 tablespoons sunflower seeds or chopped dried fruit
Instructions
- Line a pan with parchment paper.
- Mix oats, protein powder, and salt in a bowl.
- Stir in sunflower seed butter and honey.
- Add milk a little at a time until the mixture is thick and holds together.
- Fold in any optional add-ins.
- Press into the pan and chill until firm.
- Slice into bars.
Why this one works
Sunflower seed butter has the same rich, sticky quality that makes nut butter bars so easy, but it gives the bars a slightly different flavor that’s earthy and really good with vanilla.
Good to know
Some sunflower seed butters are runnier than others. If your mixture feels too soft, add a little more oats or protein powder.
Storage
Best in the fridge for 5 to 7 days.
7. Pumpkin Spice Protein Bars
These feel a little seasonal, but honestly, if canned pumpkin is in the pantry, there is no law that says you can only use it in the fall. These are soft, warmly spiced, and surprisingly satisfying.
Ingredients
- 2 cups rolled oats
- 1/2 cup canned pumpkin puree
- 1/2 cup peanut butter or almond butter
- 2 scoops vanilla protein powder
- 2 tablespoons honey or maple syrup
- 1 teaspoon cinnamon
- 1 teaspoon pumpkin pie spice
- Pinch of salt
Instructions
- Line a pan with parchment paper.
- In a large bowl, combine oats, protein powder, cinnamon, pumpkin pie spice, and salt.
- Add pumpkin puree, nut butter, and honey.
- Stir until thick and evenly combined.
- Press firmly into the pan.
- Chill until firm, then slice.
Why this one works
Pumpkin adds moisture and flavor without a lot of extra sugar. These bars have more of a soft-baked texture even though they’re no-bake, which makes them feel a little different from the nuttier bars.
Texture tip
If the mixture feels too wet, add extra oats a few tablespoons at a time until it firms up enough to press cleanly into the pan.
Storage
Keep refrigerated and eat within 4 to 5 days.
8. Dates and Cashew Protein Bars
These are the most “store-bought bar” tasting of the group, which makes sense because dates are what give many packaged bars their chewy texture. They do require a food processor, but they’re still very simple.
Ingredients
- 1 cup soft pitted dates
- 1 cup cashews
- 1 cup rolled oats
- 2 scoops vanilla or plain protein powder
- 1/4 teaspoon salt
- 1 teaspoon vanilla extract, optional
- Optional: 2 tablespoons shredded coconut or 1/2 teaspoon cinnamon
Instructions
- If your dates are dry, soak them in warm water for 10 minutes, then drain well.
- Add dates and cashews to a food processor and pulse until the mixture becomes sticky and crumbly.
- Add oats, protein powder, salt, and any optional flavorings.
- Pulse again until the mixture holds together when pressed between your fingers.
- Press into a parchment-lined pan.
- Refrigerate until firm, then slice.
Why this one works
Dates are natural glue. They hold everything together, add sweetness, and create that dense, chewy texture people expect from packaged bars.
Is this one harder?
A little. Not because it’s complicated, but because you need to blend it. If you’ve got a food processor, it’s still very manageable.
Storage
These keep very well — about 1 week in the fridge, and longer in the freezer.
Which protein bar recipe is best for beginners?
If you want the easiest possible starting point, go with one of these:
- Peanut Butter Oat Protein Bars
- Chocolate Peanut Butter Protein Bars
- Sunflower Seed Butter Protein Bars
- Trail Mix Protein Bars
These all use the same basic formula:
- oats
- nut or seed butter
- protein powder
- sweetener
- just enough liquid to bring it together
Once you’ve made one successfully, the others get much easier because you start to recognize what the texture should look like.
Which ones last the longest?
If you care most about meal prep and storage, the best options are:
- Peanut Butter Oat Protein Bars
- Chocolate Peanut Butter Protein Bars
- Trail Mix Protein Bars
- Dates and Cashew Protein Bars
These tend to hold their shape better and stay pleasant in the fridge for longer. The bars made with banana, applesauce, or pumpkin are still great, but they’re softer and best eaten sooner.
Easy ways to customize any of these
One of the best things about homemade protein bars is that once you understand the formula, you can adjust them to match your taste or whatever ingredients you have.
Swap the nut butter
Use:
- peanut butter
- almond butter
- sunflower seed butter
- cashew butter
Change the flavor
Add:
- cinnamon
- cocoa powder
- vanilla extract
- pumpkin pie spice
- shredded coconut
Add texture
Try:
- chopped nuts
- seeds
- mini chocolate chips
- raisins
- dried cranberries
Make them a little more filling
Add:
- chia seeds
- ground flax
- extra oats
Adjust the sweetness
If you don’t like very sweet bars, reduce the honey or maple syrup slightly — especially if your protein powder is already sweetened.
How to keep homemade protein bars from falling apart
This is the main issue most people run into, so it’s worth calling out directly.
If your bars are crumbly, one of these things is usually happening:
- The mixture is too dry. Add a little more nut butter, honey, or liquid.
- You didn’t press them firmly enough. Really pack them into the pan.
- You cut them before chilling. Let them firm up first.
- Your protein powder absorbs a lot of liquid. Some brands are much drier than others, so you may need to adjust.
If the mixture feels too wet, add a little more oats or protein powder until it becomes thick enough to hold its shape.
Basically, you’re aiming for a texture that feels like a thick cookie dough, not granola and not porridge.
A realistic word on protein powder
You do not need the fanciest protein powder on earth for these. In fact, if your goal is affordability, this is a great place to use whatever plain or vanilla protein powder you already have. Whey, casein, and many plant-based powders can work here, though some plant proteins create a drier texture and may need slightly more liquid.
If your powder tastes bad in a shake, there is still hope for it in a bar. Peanut butter, cocoa, cinnamon, banana, and dates can do a lot of emotional repair.
Are homemade protein bars actually cheaper?
Usually, yes, especially if you’re comparing them to individually wrapped branded bars.
The exact cost depends on your protein powder and nut butter, but in most cases, these recipes come out much cheaper per bar than the store-bought version. And because the bars are more customizable, you can also make them bigger, which is helpful if you want something that works more like a mini meal than a tiny snack.
This is one of those rare healthy eating swaps that actually feels worth the effort. You spend a little time once, and then the next few days get easier.
https://www.chewoutloud.com/5-ingredient-protein-bars-bake
https://boxlifemagazine.com/homemade-no-bake-protein-bars-pennies
Final thoughts
Healthy eating gets a lot less dramatic when you have a few reliable things you can make without overthinking. Homemade protein bars are one of those useful, low-stress habits that make busy weeks feel more manageable. They’re easy to prep, easier on your wallet, and flexible enough that you don’t get stuck eating the exact same thing every day unless you want to.
If you’re new to making them, start with the Peanut Butter Oat Protein Bars or the Chocolate Peanut Butter Protein Bars. Those are the lowest-effort, highest-reward options. Once you get the feel for the texture, branch out into the trail mix, pumpkin, apple cinnamon, or date-cashew versions.
The best homemade protein bar is not the one with the most superfoods or the fanciest ingredients. It’s the one you’ll actually make, keep in the fridge, and eat when life gets busy.
And honestly, that’s a pretty good standard for healthy food in general.
Other protein sources:

Protein bars at home honestly make life so much easier, especially when you’re trying to eat better without spending a lot.
I’ve made a few before, and they actually taste way better than the store ones. Plus, I like knowing exactly what’s in them. I usually stick with oats and peanut butter because it’s simple and filling.
One thing I’ve struggled with sometimes is getting the texture right. Do you have a protein powder you recommend that doesn’t make them too dry?
Also wondering, have you tried no-bake ones? Those are usually my go-to when I don’t feel like turning on the oven.
Definitely gave me some new ideas to try, thanks for sharing!
Thanks Monica! It was a little intimidating at first, but it’s great to be able to experiment and perfect my own protein bars. Much better than spending $2-$3 a bar. I just use a generic chocolate or vanilla whey powder, just make sure to add enough water and they usually come out pretty moist.